I discovered that my hands are more like paws when it comes to small details and that wet paper stretches to a madly frustrating degree. This being so, I decided to live with a couple of wrinkles that didn't disappear when the glue was dry. Furniture can hide a lot of flaws, right?

I bought this dollhouse at an auction several years ago, long before the mini-mania that infects me now had struck. As I mentioned before, I had always wanted a dollhouse, so I bought this one. But then I put it up in my bedroom and filled it with odds and ends (not miniatures) and never really looked at it again. (I have the missing shutter - I just have to find it. It's among the odds and ends in the bedroom.)
The house's previous owner had wallpapered it, but very badly. The only paper that was even close to the right scale was put on sideways with its stripe running horizontally across the room. A few weeks ago I battled this house down the stairs and into the living room (which has unfortunately become my work room). I stripped the walls, full of optimism, excitement and creative ideas.
I had grown bored with commercial wallpapers and decided to create my own (cheaper too). Some of them I am very pleased with, some didn't really work, but I think that, overall, the project was a success.

Here is the dining room. I have shown you this before. but this is a better picture

I researched Victorian wallpapers and then made the background paper, ceiling paper, and borders and the parquet floor in PhotoShop. They are copies of wallpapers from around 1890. I was delighted to learn that the Victorians loved to paper their ceilings too. Good idea, especially as I didn't bother to prime the inside of the house (I know, I know, I am too impatient.) The door is just a flat colour printout, but looks pretty good, don't you think?
I fell in love with this Arts and Craft Hollyhock paper complete with border and ceiling medallions. I put it in the bedroom with a commercial hardwood floor. I still have to fix the ceiling - it doesn't reach the edges. I am waiting for renewed energy.

Since I had the Chrysnbon treadle sewing machine and dress form kit I thought the house needed a sewing room. I made the third floor into three small rooms instead of two as it was originally. I really like the green striped wallpaper, and I was quite pleased when I came across the twisted rope wood trim at Michael's. I painted it gold to go with the ceiling border.

I used a couple of leftover pieces of wood flooring in this room and they don't quite match, but I plan to put down a throw rug.

I used a couple of leftover pieces of wood flooring in this room and they don't quite match, but I plan to put down a throw rug.
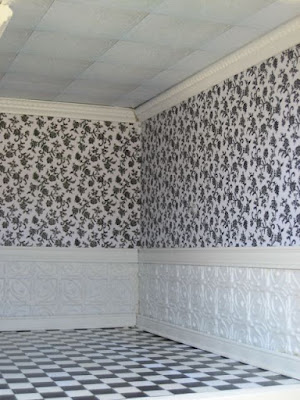
The bathroom may not be authentically Victorian, but I like the clean contrast of black and white. I papered the ceiling with a print-out of turn-of-the-century tiles. I am not sure whether I like it or not, but I will live with it for now.

I struggled with the living room design. I had picked out a lovely 1908 wallpaper with a deep dado and flowered border - very William Morris. It looked so good on the computer. Several times I placed it into the room to see how it was going to look, but it just wasn't giving me the effect I was looking for. I even went so far as to glue the paper in. I got out the squirt bottle and scraper and took it all out again. At one point I thought I would never be finished with this house because I just couldn't find a paper I liked. Finally I gave up and started looking for a new project. I had picked up a sheet of plastic marble at the Little Dollhouse store, but had no plans for it yet. I was trying to figure out what to make out of it when I suddenly saw that it would make an elegant wainscoting for the living room. I had made the wallpaper previously, but had no firm plan for that either. They look great together I think. I probably should have changed the floor too, but it was all ready to go, so I used it. I think a lighter parquet might suit better, though.


My next blog will cover the nursery. Then I will show you how it looks furnished. I still need to take the pictures. Back soon.
Susan
Susan


I think the effects of your papers are really coo. The bathroom is my favorite, although the hollyhock paper in the bedroom is a close second. :-)
ReplyDeleteThis a verry beautiful house, nice that you are now starting with the house. Wallpapering is not my favorite thing also. But it looks verry good, you did a great job! Your bathroom is my favorite!!
ReplyDelete* marlies
It really is a nice house and the wallpapers really suit it. The papers that you have done your self are lovely.
ReplyDeleteDebie xxx
I love the Alice in Wonderland wallpaper!
ReplyDeleteVery nice! You might also check the scrapbook aisle the next time you are at Michael's. I have found some wonderful papers there! I scan them in and rescale them to fit. One thing you might want to do next time, I always spray my printed papers with clear semi gloss before installing. This will prevent the papers from fading over time. Printer ink will fade very quickly without it. You also might want to print on cardstock for easier installation. Just a thought or two!
ReplyDeleteThanks for the great tips Heather. I would hate to have the papers fade after all that work. Cardstock sounds like s good idea to help with the stretching. I love this community. You can learn so much.
ReplyDeleteHugs,
Susan
It's lovely, well done
ReplyDeleteYou did a wonderful job on the Strawberry Patch. I think I'm going to take out the stairs and make some false doors on the back wall. Luckily mine hadn't been wallpapered yet.
ReplyDeleteLove your blog. Love the stories and all the great finds. Your dream house is my dream house too. I'm going to keep looking on Craigslist for one!